People and Place
Project 1: People aware
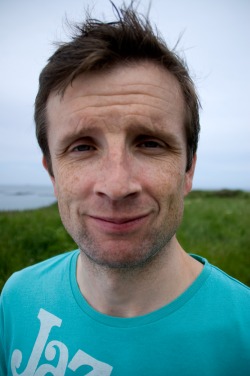
Exercise 1: Portrait, scale and setting
The plain background used for these images is completely unobtrusive and firmly puts Martin into the role as main subject. The clothes are rather neutral but the hat adds a little extra. I did not use a tripod for this exercise because I found it more difficult to frame the image with a tripod.
- The first image with the face cropped in close, is the most personal and intimate one. It's like you can have a closer look at the person, as the eyes and expression are more accentuated. I used the far end of the lens I was using, at 55 mm focal length, to avoid distortion by a wide angle. A close up like this could create a static feel if the subject is looking straight into the camera, as I have discussed in relation to dead pan photography. By looking away from the camera, the subject creates a less confrontational situation. This is my favourite image in this exercise.
- The second image is a head and shoulder shot. I chose a horisontal format as I like a bit of negative space in an image. It gives it a bit breathing room. The image feels less crowded. Since the subject is taller than me I stood on a little stool, and he is slightly looking up to me. The shoulders are at an angle. The full hat can now be seen, so the clothes play a greater role than in the first image.
- In the third image the full torso can be seen. You get a greater idea of the full figure. It can be difficult to know what to do with the hands, so here they are tucked behind the back. Again the shoulders at an angle creates a less confrontational image.
- In the fourth image the whole body shape gets the full attention. This is also the most difficult pose when the subject asks "How shall I stand". Everything is obvious and visible. I think professional models are probably very used to standing in an interesting way but it's not that easy when both the photographer and the model are beginners.
 Face, cropped in close |
 Head and shoulders |
 Torso |
 Full figure |
Exercise 2: Thinking about location
I started by taking pictures of very even-looking and single colour surfaces. These backgrounds could be anywhere and have more or less the same purpose as a studio background. I quite like the colourful backgrounds in an image. But then I also wanted to capture some settings which tell a bit more about the location.
In all varieties of backgrounds, I noticed the importance of even and flat lighting. Even if the face is in the shade, sunshine can create blown highlights in the background.
I think the "No Parking" letters are small enough not to take away from the portrait, but adds a little twist.
So I asked Anne Marie to stand in front of the "No parking" gate. The image has an urban feel. She was wearing a red cardigan which went nicely with the red and blue letters. I didn't feel it was necessary to include the full writing in the final image. The location is in the shade on a half sunny day, so I think the image would have been improved if a reflector had given the face some extra light.


Exercise 3: Experimenting with light
Here Brian is sitting by a window in front of a book case, as I thought it would be an interesting but not too dominant background. I used a small aperture to put the subject in focus, and not to show the background too much. A tripod was used throughout to keep a steady composition. I think I might have had a focus issue here in these images, as the eyes are not as sharp as I would have liked them to be.
 |
Natural light from the window. This creates a very bright left side, whereas the right side is in relative darkness. It looks too contrasty.
|
 |
Natural light from the window, with a silver reflector on opposite side. This creates more even lighting which complements the face better. I think this is the best lighting situation in this series.
|
 |
Flash straight forward as only light source. This creates a very unflattering and harsh light. Neither the subject nor the background looks good here.
|
 |
Flash reflecting in the ceiling and bouncing card behind the flash, reflecting the light forward. Both the ceiling and the bounce card create large light sources, which give a more even look.
|
 |
Flash reflecting in the ceiling and bouncing card behind the flash, reflecting the light forward, and a silver reflector under the face. Big light sources from all directions create an extremely flat lighting. The subject looks a bit washed out, as not planes of the face are in shadow.
|
 |
One tungsten light used behind/on the side, quite close to the subject. This creates a small light source which is quite sharp and harsh. The result is a dramatic look with one side of the face in light and the other side in complete darkness.
|
Exercise 4: An active portrait
Here is another Brian who is a singer. I asked him to sing while I took a few photos of him, trying to catch a few expressions. Maybe singing isn't the most flattering activity to capture as the mouth can end up in strange expressions sometimes. With the black background and spotlight it looks like he is on a stage, which gives it quite an authentic feeling.


Exercise 5: Eye-contact and expression
Exercise 5 and 6 were taken the same evening, as the rain started to drizzle. The clouds acted as a big diffuser and made the light very flat. I think a prefer a bit of sun, and then reflecting the sun into the shade. It makes the image a bit more interesting, and creates a glint in the eye. To get a little bit of light on the face, I used a reflector under the face. I noticed afterwards that this can give unflattering shadows underneath the eyes. To improve this in postprocessing I used the Dodge tool in Photoshop set on shadows, to lighten up under the eyes.
In the photo sequence of Taryn below, I asked her to look and turn her head in different directions. I directed her by pointing and showing with my body how I wanted her to turn. I didn't use a tripod.
The various directions create different looks:
In the photo sequence of Taryn below, I asked her to look and turn her head in different directions. I directed her by pointing and showing with my body how I wanted her to turn. I didn't use a tripod.
The various directions create different looks:
- Looking to one side makes us wonder what she is looking at. This photo is not great because her eyes are out of focus.
- Looking straight with chin down looks shy.
- Turning the head by keeping eye contact looks flirty and fun.
- Chin up, looking straight looks confident.
- Body turned away, looking straight looks nice, like a standard portrait.
- Looking away as a profile, shows a strong character.
- Looking in between away and straight looks indecisive.
- Looking straight and up looks friendly, maybe because we as viewers don't feel intimidated by someone looking up.


Exercise 6: The best of a sequence
During this shot with Avril I took 44 images in total. I didn't use a tripod, as I feel it restricts me. I like to be more spontaneous but tried to keep a steady framing with a few variations. I kept checking the camera screen to see how the photos turned out. It started quite well and I kept snapping away, to make sure I got all the opportunites for a good shot. The variations I saw while I was shooting was differences in facial expressions, like closing the eyes, laughing out loud etc. Also the lighting varies from frame to frame. But just because you take many photos in one sequence, it doesn't mean they get better and better. It can be a photo in the middle that turns out the best.
I stopped the sequence when I had a lot of good possibilities. At the time I hadn't decided for one single best image. At home I rated the photos in the sequence by giving them stars in Photoshop Organizer. Towards the end I had 8 good photos to choose from. The single best one I chose is below. This shot didn't stick out during the shot, as it's more subtle and unassuming. It proves that you have to study the images on a big screen before you can decide which one is the best.
The reasons I chose the one below are nice facial expression, OK lighting and a good background. It seems like I have a tendency to cut of the top of the head, but does it really matter? Not necessarily I think. A cropped image can give a more intimate feel. I have noticed a lot recently that it would be good to be a bit taller or to stand on a step, to get more even hight with the subject. It's nice if the model looks up a few degrees, I find. Depeche Mode said something like that about Anton Corbijn - one of my heroes - that he takes great photos because he is so tall, and sees the world differently.

The full sequence

The best single shot
Exercise 7: Focal length and character
For these images I used a silver reflector screen, which makes a great difference in outdoor portrait photography. But I still think the eyes could be brighter. I'm not sure how that could be done. It was slightly cloudy weather, but even then the reflector screen can make the face very bright. It can even be difficult to keep the eyes open because of the reflection.
This series of photos also proves that it's better if the model wears plainer pattern clothes, as patterns and design can take over in the image.
My conclusion from this exercise is the 50 mm focal length works best for close up portraiture.
This series of photos also proves that it's better if the model wears plainer pattern clothes, as patterns and design can take over in the image.
My conclusion from this exercise is the 50 mm focal length works best for close up portraiture.
 |
200 mm focal length. This looks quite OK, but I think the head looks slighter wider at the top.
|
 |
50 mm focal length. This looks good and I think this focal length gives the best representation of reality.
|
 |
18 mm focal length. I was laughing out loud when I saw this! Brian looks like a round fish. I shall certainly avoid this focal length for portrait close ups. He also felt as if the camera was touching his face.
|
Exercise 8: Varying pose
To prepare for this exercise I looked at photographs, mostly on the web, to see how people pose. I think you have to decide what kind genre of photography you want to create. For instance in fashion photography, some poses can seem a bit unnatural and artificial. I found many good examples from Vogue. Here are a few examples from the German Vogue. I think the photos here are beautiful.
I found a webpage of many pose suggestions. Some of these seem a bit strange, but I can pick out a few useful from these.
There are many clips on Youtube with suggestions on how to pose and instruct a model.
I found a webpage of many pose suggestions. Some of these seem a bit strange, but I can pick out a few useful from these.
There are many clips on Youtube with suggestions on how to pose and instruct a model.
Between weather, work and other commitments, it took ages before Suzanne and I could meet up to do this exercise. But one day between the showers, we managed to get a few pictures done. I asked Suzanne to do different variations of standing, sitting and squatting. I had printed out the suggestions from above, but it's still quite difficult to come up with interesting poses. In the beginning of the session, both the photographer (me) and the model (Suzanne) where a bit unsure and stiff, but as we got more into it, the easier it got. I think you get the best results as you play around and loosen up. Not every pose worked, but the images below work quite well I think. For the squatting images, there are not that many variations possible, apart from looking in different directions. Overall this exercise was good for me, because I normally tend to concentrate on the torso/headshot.


Assignment 1 - A comprehensive portrait
This assignment asks for different portraits of one person, which should differ in type and style. The images should come from separate photographic sessions and is more useful as an exercise if I took some time over it. And I certainly did! To get all the factors together wasn’t easy logistics – me, model, weather, time, holidays etc etc.
I have used my friend Aoife for these portraits. I don’t usually see her every week so if I had chosen for example my husband, the preparation of this assignment would probably have taken shorter time. But I thought Aoife would suit as a model, so I persisted. My aim was to capture her in various situations, and create different kinds of looks and styles. I have mixed colour and black and white images. I wouldn’t normally do this within the same assignment, but suited the purposes of this assignment. My aim was also to include the various things learnt in the exercises, so I have used various scales, from full body to close ups, various backgrounds, and also an active portrait.
I have worked with Aoife at various occasions over a couple of months. She is very natural but obviously in the beginning she would ask “How should I stand? How shall I look? Shall I smile?” But over time both her and I got more used to how to work on the pictures for this assignment. I became better at giving directions because I felt more comfortable and knowledgeable – and she followed with enthusiasm. It’s obviously easier to build up this rapport if you already know each other, but with experience, this should easily be possible to use on any portrait session. Over the summer I have taken many portraits of friends and their children, and I really enjoy the experience and practice. This has quite surprised me since I started this course, since before I had hardly done any portraiture at all. I have discovered something new to enjoy.
The six images I present in this assignment are all the result of my thought process. For each I had a concept in my mind – a plan of how I wanted it to look, what I wanted to express. The images mightn’t turn out exactly how I envisaged them, but I think that is very interesting too. I really enjoy feeling inspired by various things, feeling creative and to turn this into an image. The final image is like an idea being born into the real world. It can be limited by factors like technology, time and place. It might not be exactly how I imagined it, but could still be a good image I’m happy with.
During each photo shoot I’ve tried to capture the best look and expression, trying various angles. It resulted in numerous photos and the subsequent selection process was an important element in finding that one image which I deemed the best. It can take a long time and energy, but using the rating system in Photoshop Organizer and thereby creating a shortlist, made this process smoother.
It is at the same time important to think about the power you have over making a portrait which represents a person. I watched a programme with Sally Mann, who is famous for her black and white photographs of people, mostly her children. They were often taken at their house in a forest, so in many photographs the children were naked. As Sally Mann said, why would you put a bathing suit on a five year old in the middle of a forest with no neighbours. Many people were upset about this nudity, whereas Sally Mann thought they overreacted. She now has an increased mistrust of portraiture and the notion of what can be done with a fraction of a second that you “steal” from a person’s life. Out of a series of photos from one session, there might be one that expresses something extra special or interesting. It could be an intense expression and funny look. She drew the parallel to the photo of a boy with a hand grenade by Diane Arbus. That one photo might not be representative of the individual. That is what portraiture can do. You can chose that one image which is more extreme and angled. The more Sally Mann works with photos, the less willing is she to take the chance of hurting someone with a photograph.
This learning process has made me think – what is a portrait? I would have liked to make a portrait using different parts of the body, for example only the hands, only seeing from the back, etc, but I felt it probably didn’t fit the assignment. But it would have been interesting as different body parts can tell a lot about a person too, not only the face. The examples in chapter one of the course only show faces and fronts of bodies, so I made sure I stayed within the framework of the assignment. I was also thinking about doing a self portrait, but it’s logistically more difficult, and I wanted to concentrate on being behind the camera, which is quite comfortable, instead of being exposed in front of it.
My tutor asks for the images on a CD so I have processed the images for being seen on a monitor screen. I have kept the highest resolution I could for the images on the CD, converted the colour profile to sRGB and saved for web. I have another set of the images, which I have saved in less resolution, 72 ppi and smaller size, and these are for putting up on my online learning blog.
I feel I have only started exploring the possibilities with portraiture and I really enjoy the communication it brings with it. In order to develop technically, I think I will just have to continue and practice and simply become more used to it. To develop artistically, I will continue to look at other artists to gather information. The only thing which hinders my development, is the lack of time, as I certainly feel I have the creativity, persistence and ambition to improve.


My tutor quickly returned feedback on this assigment. It contained some good ideas and tips. He also recommended three photographers to look closer at, and a book for suggested reading: "Five great photographers". I will put the book on my wish list, but from the names I recognise the photographers seem to be historic and even though I know it's useful to know the history, I would like to concentrate more on contemporary photography and to be aware of what's happening now. When I studied TAOP I read up a lot about photographers in history, to a great deal in "Photography - a concise history" which came with the course. Since then I have wanted to concentrate more on contemporary photography.
He mentions that a jpg can be edited in the Raw interface by clicking open as "Camera raw". I didn't know this, and haven't tried yet. I do mostly shoot in the Raw format anyway, but it's still good to know. The comment on the angel picture lacking facial expression and looking uncomfortable, I can kind of agree with. It's what I felt too being in a studio. The situation was new both to me and my model. As I mentioned in my text for the assignment, I would like to work more with natural lighting, rather than artificial studio lighting. Another piece of advice is to use a black a reflector to reduce glare. I suppose this would work in same way as to create an open shade like situation.
I'm glad he is impressed by my post processing, but I do agree that it's preferrable to create the perfect image to begin with. In fact when I did TAOP I did no processing whatsoever as I wanted to concentrate on learing composition etc. It was first with DPP that I started postprocessing and I suppose now with People and Place that I bring the composition and postprocessing together.
Finally he suggests I should check out a 135mm focal length for portrait close up, to avoid distortion. I had used a 55 mm focal length for my close up image in this image, and it seems to have produce a good image, my tutor suggests. I would not have the possibility to get a 135mm prime lens at this point in time, but I suppose I could use my 18-200mm lens at 135mm, for portrait close ups. I must try this.
Below are remakes of three of the images, based on suggestions for improvements.

Removed blown highlight in hair.

Lightened up the eyes.

Removed three hightlights in the eye.
