People and Place
Project 4: People interacting with place
Exercise 19: A single figure small
The image below is taken from a position above. There are two versions of it. I decided make a tighter crop to declutter the image further and I think it looks better. It concentrates on the person, shadow and street markings more. I converted the image into black and white, as it emphasises the graphic qualities. In the second image, the person is walking out of the frame.The image might have been more dynamique if it had been walking into the frame. But at this particular moment, I captures what I saw. What I like particulary about the image is the two diagonal lines the person and shadow creates and the half circle beside it.
 |
 |

Here is another example of a single small figure. I have desaturated the image, but then made a selection of the figure and increased the contrast considerably, to give the figure more impact. An idea could have been to change the swim trunks to red.
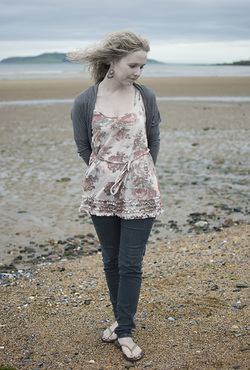
In the exercise brief it encourages us to pay close attention to the framing of the figure and that a more off centre position could make more dynamique.
However in this image, I have made sure the figure is exactly in the middle and the shore line divides the image exactly in half. As mentioned before I like that kind on minimalistic simplicity and that there is a time and a place for it.
Exercise 20: Busy traffic
This image shows people in a fruit market. I am standing on an upper floor looking down at the people passing by. This viewpoint shows the busy traffic efficiently. The image is also framed in way to show the busyness, excluding any empty areas.

Exercise 21: Making figures anonymous

Small and many. This image was used for project 14, but I think it illustrates how small and many can make people anonymous.

A headless figure.

A silhouette
Exercise 22: Adjusting the balance between person and space
Exercise 23: Selective processing and prominence
I haven't used a lot of postprocessing for my images in the course, but one example is the girl with the pigeons in exercise 10 where I used a technique to make the figure stand out more against the background. I made a selection and added blur to the background. This exercise practices a similar idea.

The starting point is this image - used in exercise 8.
I made a selection of the figure and decreased the saturation and increasing lightness. The result is that the figure is very simular to the background.

In this image a warm filter has been used on the selection of the figure. I then inverted the selection and added blur to the background. The figure certainly stands out from the background. It's kind of an interesting look even though it doesn't look natural. It looks as if she is standing in front of a studio backdrop.
Assignment 4: A sense of place
This assignment asks for images which convey a sense of place, to be published in an "intelligent, thoughtful travel publication". The publication which comes in mind and which I will aim to model this assignment for, is National Geographic. This publication is well known for its beautiful images which probably have covered every corner of our globe. I have read many issues of National Geographic throughout the years, and have noticed that for articles covering places (as opposed to articles covering scientific subject matters) the images range from places to close ups of people.
For an editor to be able to use the images, they need to know what the images illustrate. A magazine like National Geographic requires the photographer to hand in a caption with the photo with approximately 30-50 words.[1] Each of my photos in this assignment also (as always) contain a description.
How do I see the essential character of the place?
The place I have in mind for this assignment is Halmstad and more specifically winter time at Christmas. The aim is to show both the character of the place and the people with as much variety as possible - different matter and scale. I understand this as a mix of spaces and people and as mix of what I have learnt from Chapter 2 and 3 in this course – people unaware and buildings and spaces.
Halmstad around the time of Christmas is a snowy and cold place. People cover themselves from top to toe when they go out and it gets dark early. People spend more time being warm inside. Christmas is also the time for traditions and for families to get together.
I grew up in Halmstad so I know the area and traditions very well. My aim is to show someone who has never visited what it’s like, both exterior and interior.
Drafting ideas:
Day light (compact for candid shots, regular):
Low light (using tripod):
Indoor (using compact):
Interior images Christmas celebrations (flash/bouncer/diffuser):
Opportunities not available
It gets dark early at winter so I have to consider the light problems more carefully. It’s also cold outside, so I have to be careful to get a balance between indoor and outdoor situations.
I went to a lively concert in the church, and I tried to get some shots of the choir. But it was too dark in the church, and I didn’t get to the front row which might have saved the situation by being closer.
Overall, I think the images cover a broad range of subject matters.
Camera choice
For this assignment I have used two different cameras: Nikon D40 and Nikon COOLPIX P7000. The latter was used for street situations, because it is easier to carry with me and to have ready when I see something interesting.
The problems I had with the COOLPIX P7000, was that its RAW format is called NRW, which is not compatible with Photoshop. I had to do some investigation which I have mentioned in my learning blog, and found a converter to convert NRW files to DNG files, and this works with Photoshop.
The focal length on the COOLPIX P7000 seems to be noted in a different scale and I don’t quite understand it. The maximum focal length is 42.6mm and the minimum focal length is 6 mm. My conclusion is that the lens must work in a different way to my Nikon D40 where the shortest focal length, which gives a wide angle, is 18 mm.
It might be questionable if I should use a point and shoot camera at all at this stage in my development. The pros are that it’s easier to be descreet, but the cons are that in reality I am not using the full funcionalities of the camera using manual settings. Especially in low lighting, the auto settings can suggest very high ISO, which could give the image such high noise it makes it impossible to use.
Taking pictures for an article
Had this not been an assignment for taking pictures for an article to be published, I might not have thought of and planned to cover a wide range of situations, and different scale. The assignment gave me a framework to diversify the type of images.
The assigment asks for sufficient images to fill six pages, which would could mean six final choses images. I supply 13 images for this assignment, but have marked the six I suggest should go into the article. In the end it is naturally the editor’s choice. I have chosen the images to cover different scales, people and spaces, and different light situations. I think these images can give a viewer an idea of what it is like in Halmstad in the winter.
The six images are:
[1] In Focus: National Geographic Greatest Portraits, p 95
For an editor to be able to use the images, they need to know what the images illustrate. A magazine like National Geographic requires the photographer to hand in a caption with the photo with approximately 30-50 words.[1] Each of my photos in this assignment also (as always) contain a description.
How do I see the essential character of the place?
The place I have in mind for this assignment is Halmstad and more specifically winter time at Christmas. The aim is to show both the character of the place and the people with as much variety as possible - different matter and scale. I understand this as a mix of spaces and people and as mix of what I have learnt from Chapter 2 and 3 in this course – people unaware and buildings and spaces.
Halmstad around the time of Christmas is a snowy and cold place. People cover themselves from top to toe when they go out and it gets dark early. People spend more time being warm inside. Christmas is also the time for traditions and for families to get together.
I grew up in Halmstad so I know the area and traditions very well. My aim is to show someone who has never visited what it’s like, both exterior and interior.
Drafting ideas:
Day light (compact for candid shots, regular):
- Shopping in town: this will offer shots for people unaware and test my observation skills.
- Christmas trees for sales
- Kids playing
- Empty playground
Low light (using tripod):
- Light decoration along the main street – Storgatan
- Appartment lights
- Church
Indoor (using compact):
- Shopping centre sales
Interior images Christmas celebrations (flash/bouncer/diffuser):
- Food
- Dancing
- Family portrait
Opportunities not available
It gets dark early at winter so I have to consider the light problems more carefully. It’s also cold outside, so I have to be careful to get a balance between indoor and outdoor situations.
I went to a lively concert in the church, and I tried to get some shots of the choir. But it was too dark in the church, and I didn’t get to the front row which might have saved the situation by being closer.
Overall, I think the images cover a broad range of subject matters.
Camera choice
For this assignment I have used two different cameras: Nikon D40 and Nikon COOLPIX P7000. The latter was used for street situations, because it is easier to carry with me and to have ready when I see something interesting.
The problems I had with the COOLPIX P7000, was that its RAW format is called NRW, which is not compatible with Photoshop. I had to do some investigation which I have mentioned in my learning blog, and found a converter to convert NRW files to DNG files, and this works with Photoshop.
The focal length on the COOLPIX P7000 seems to be noted in a different scale and I don’t quite understand it. The maximum focal length is 42.6mm and the minimum focal length is 6 mm. My conclusion is that the lens must work in a different way to my Nikon D40 where the shortest focal length, which gives a wide angle, is 18 mm.
It might be questionable if I should use a point and shoot camera at all at this stage in my development. The pros are that it’s easier to be descreet, but the cons are that in reality I am not using the full funcionalities of the camera using manual settings. Especially in low lighting, the auto settings can suggest very high ISO, which could give the image such high noise it makes it impossible to use.
Taking pictures for an article
Had this not been an assignment for taking pictures for an article to be published, I might not have thought of and planned to cover a wide range of situations, and different scale. The assignment gave me a framework to diversify the type of images.
The assigment asks for sufficient images to fill six pages, which would could mean six final choses images. I supply 13 images for this assignment, but have marked the six I suggest should go into the article. In the end it is naturally the editor’s choice. I have chosen the images to cover different scales, people and spaces, and different light situations. I think these images can give a viewer an idea of what it is like in Halmstad in the winter.
The six images are:
- Stora torg (main square)
- Winter street
- Santa’s sack
- Sperlingsholm church
- Wonderful life
- Icehockey
[1] In Focus: National Geographic Greatest Portraits, p 95


I received my tutor's comments promptly, as always. It contained some valuable advice. Firstly, he had substituted one of images for the "final six", from one I had chosen as an extra image. This is obviously OK, as this is something an editor of a magazine might do. The image called "A wonderful life" is a dark picture, but it's an experimental image where I tried something different. In my opinion if also depicts something typical of the season and fits into the theme. I get the impression that my tutor like less experimental images and prefers to exchange them with clearer and more conventional ones. This is fine, and if I did this work for an editor, I would try to customise them more for what that particular editor liked. However, this is not a commercial situation, so I like to add my own quirkiness too.
Secondly, my tutor suggested a change in the post processing of the image called "Stora torg". I can see that the changes the tutor has made to the image improves the visibilty of the image. One has to ask oneself though how much we should manipulate reality. This image was taken in late afternoon in the winter, so the light was quite blue. Should this stay to convey a truer idea about the fact that it gets dark early in the winter. I have made the changes below as the tutor suggested, and I do agree it creates a punchier image. It is also very useful to know that it's possible to open jpg as raw. He had mentioned that previoulsy, but I hadn't actually tried it. So after a quick internet search, I learn how: Make a copy of the jpg -> In Photshop, Open as -> Camera Raw. Very handy!
Secondly, my tutor suggested a change in the post processing of the image called "Stora torg". I can see that the changes the tutor has made to the image improves the visibilty of the image. One has to ask oneself though how much we should manipulate reality. This image was taken in late afternoon in the winter, so the light was quite blue. Should this stay to convey a truer idea about the fact that it gets dark early in the winter. I have made the changes below as the tutor suggested, and I do agree it creates a punchier image. It is also very useful to know that it's possible to open jpg as raw. He had mentioned that previoulsy, but I hadn't actually tried it. So after a quick internet search, I learn how: Make a copy of the jpg -> In Photshop, Open as -> Camera Raw. Very handy!

New version after tutor's comments.
